
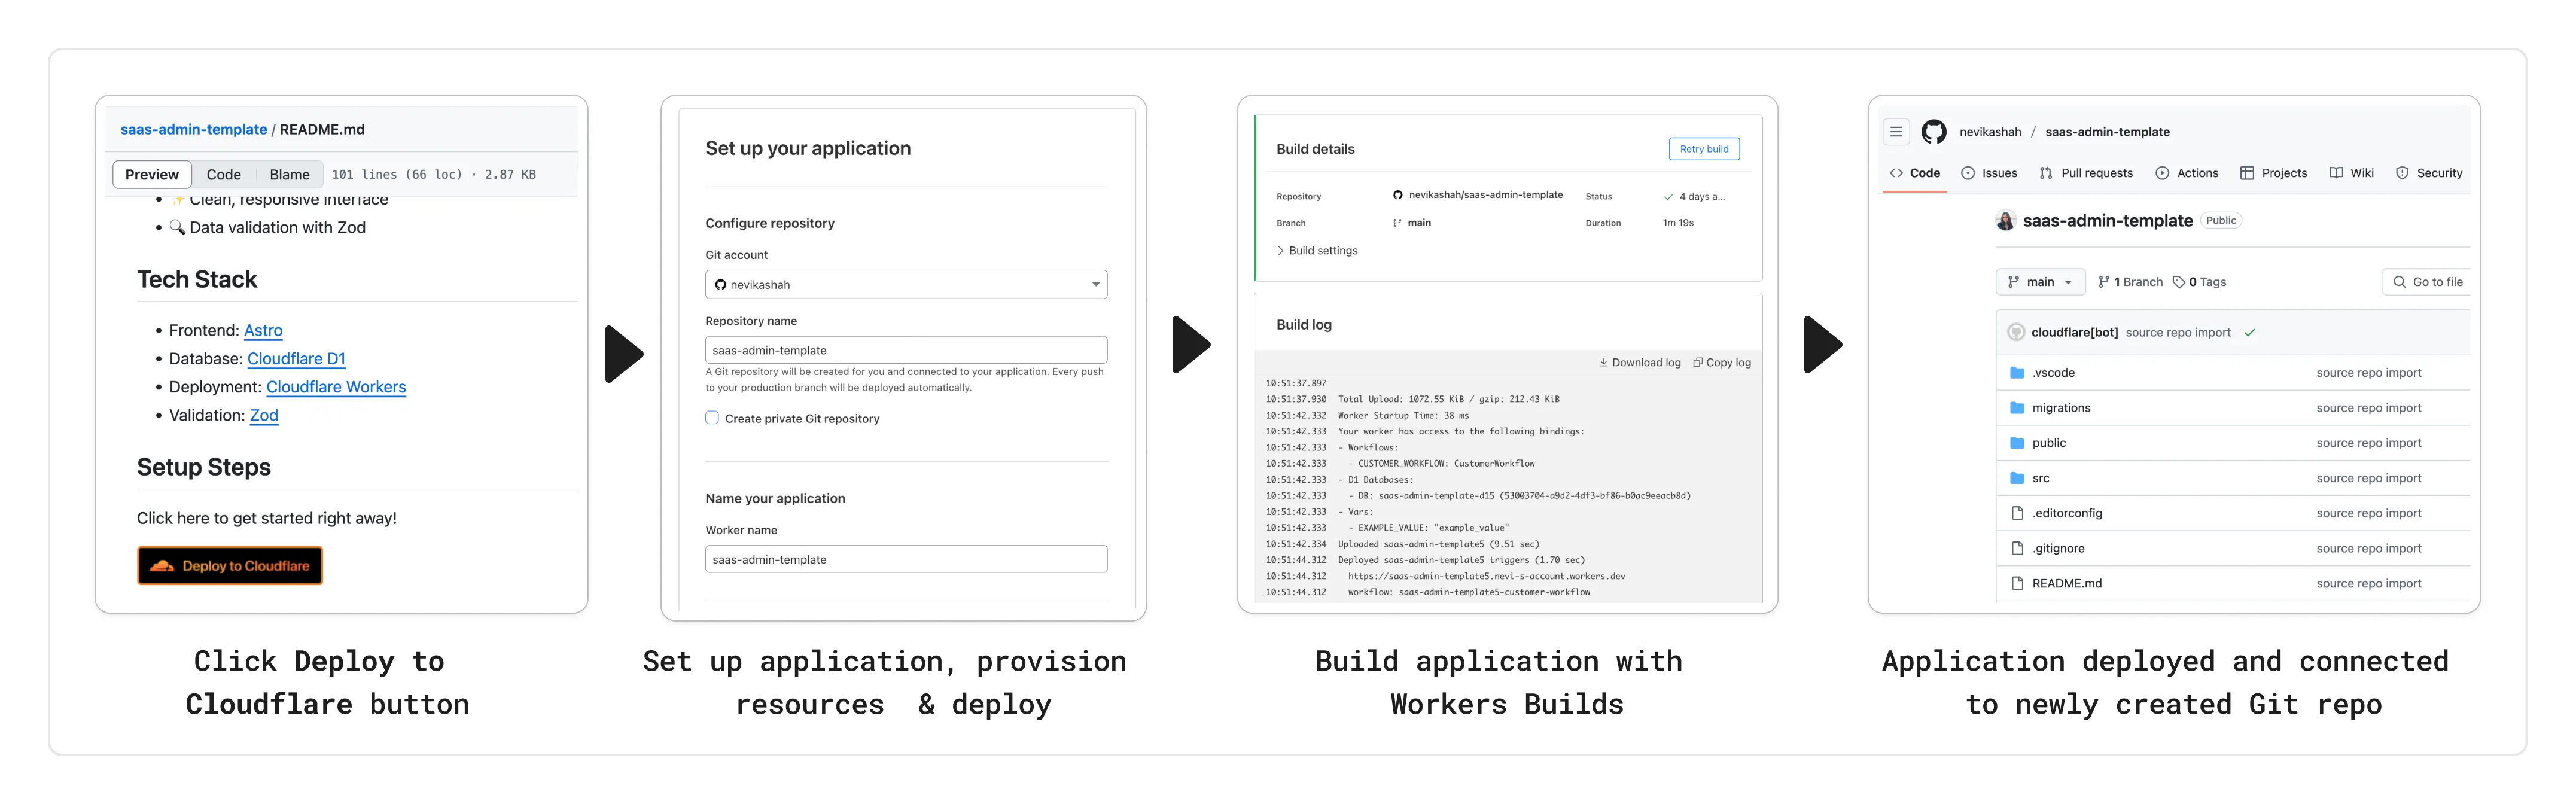
You can now add a Deploy to Cloudflare button to the README of your Git repository containing a Workers application — making it simple for other developers to quickly set up and deploy your project!
The Deploy to Cloudflare button:
- Creates a new Git repository on your GitHub/ GitLab account: Cloudflare will automatically clone and create a new repository on your account, so you can continue developing.
- Automatically provisions resources the app needs: If your repository requires Cloudflare primitives like a Workers KV namespace, a D1 database, or an R2 bucket, Cloudflare will automatically provision them on your account and bind them to your Worker upon deployment.
- Configures Workers Builds (CI/CD): Every new push to your production branch on your newly created repository will automatically build and deploy courtesy of Workers Builds.
- Adds preview URLs to each pull request: If you'd like to test your changes before deploying, you can push changes to a non-production branch and preview URLs will be generated and posted back to GitHub as a comment.
To create a Deploy to Cloudflare button in your README, you can add the following snippet, including your Git repository URL:
[](https://deploy.workers.cloudflare.com/?url=<YOUR_GIT_REPO_URL>)Check out our documentation for more information on how to set up a deploy button for your application and best practices to ensure a successful deployment for other developers.
The following full-stack frameworks now have Generally Available ("GA") adapters for Cloudflare Workers, and are ready for you to use in production:
The following frameworks are now in beta, with GA support coming very soon:
- Next.js, supported through @opennextjs/cloudflare ↗ is now
v1.0-beta. - Angular
- SolidJS (SolidStart)
You can also build complete full-stack apps on Workers without a framework:
- You can “just use Vite" ↗ and React together, and build a back-end API in the same Worker. Follow our React SPA with an API tutorial to learn how.
Get started building today with our framework guides, or read our Developer Week 2025 blog post ↗ about all the updates to building full-stack applications on Workers.
- Next.js, supported through @opennextjs/cloudflare ↗ is now
When using a Worker with the
nodejs_compatcompatibility flag enabled, the following Node.js APIs are now available:This make it easier to reuse existing Node.js code in Workers or use npm packages that depend on these APIs.
The full
node:crypto↗ API is now available in Workers.You can use it to verify and sign data:
JavaScript import { sign, verify } from "node:crypto";const signature = sign("sha256", "-data to sign-", env.PRIVATE_KEY);const verified = verify("sha256", "-data to sign-", env.PUBLIC_KEY, signature);Or, to encrypt and decrypt data:
JavaScript import { publicEncrypt, privateDecrypt } from "node:crypto";const encrypted = publicEncrypt(env.PUBLIC_KEY, "some data");const plaintext = privateDecrypt(env.PRIVATE_KEY, encrypted);See the
node:cryptodocumentation for more information.The following APIs from
node:tlsare now available:This enables secure connections over TLS (Transport Layer Security) to external services.
JavaScript import { connect } from "node:tls";// ... in a request handler ...const connectionOptions = { key: env.KEY, cert: env.CERT };const socket = connect(url, connectionOptions, () => {if (socket.authorized) {console.log("Connection authorized");}});socket.on("data", (data) => {console.log(data);});socket.on("end", () => {console.log("server ends connection");});See the
node:tlsdocumentation for more information.
The Cloudflare Vite plugin has reached v1.0 ↗ and is now Generally Available ("GA").
When you use
@cloudflare/vite-plugin, you can use Vite's local development server and build tooling, while ensuring that while developing, your code runs inworkerd↗, the open-source Workers runtime.This lets you get the best of both worlds for a full-stack app — you can use Hot Module Replacement ↗ from Vite right alongside Durable Objects and other runtime APIs and bindings that are unique to Cloudflare Workers.
@cloudflare/vite-pluginis made possible by the new environment API ↗ in Vite, and was built in partnership with the Vite team ↗.You can build any type of application with
@cloudflare/vite-plugin, using any rendering mode, from single page applications (SPA) and static sites to server-side rendered (SSR) pages and API routes.React Router v7 (Remix) is the first full-stack framework to provide full support for Cloudflare Vite plugin, allowing you to use all parts of Cloudflare's developer platform, without additional build steps.
You can also build complete full-stack apps on Workers without a framework — "just use Vite" ↗ and React together, and build a back-end API in the same Worker. Follow our React SPA with an API tutorial to learn how.
If you're already using Vite ↗ in your build and development toolchain, you can start using our plugin with minimal changes to your
vite.config.ts:vite.config.ts import { defineConfig } from "vite";import { cloudflare } from "@cloudflare/vite-plugin";export default defineConfig({plugins: [cloudflare()],});Take a look at the documentation for our Cloudflare Vite plugin for more information!
The Agents SDK now includes built-in support for building remote MCP (Model Context Protocol) servers directly as part of your Agent. This allows you to easily create and manage MCP servers, without the need for additional infrastructure or configuration.
The SDK includes a new
MCPAgentclass that extends theAgentclass and allows you to expose resources and tools over the MCP protocol, as well as authorization and authentication to enable remote MCP servers.JavaScript export class MyMCP extends McpAgent {server = new McpServer({name: "Demo",version: "1.0.0",});async init() {this.server.resource(`counter`, `mcp://resource/counter`, (uri) => {// ...});this.server.tool("add","Add two numbers together",{ a: z.number(), b: z.number() },async ({ a, b }) => {// ...},);}}TypeScript export class MyMCP extends McpAgent<Env> {server = new McpServer({name: "Demo",version: "1.0.0",});async init() {this.server.resource(`counter`, `mcp://resource/counter`, (uri) => {// ...});this.server.tool("add","Add two numbers together",{ a: z.number(), b: z.number() },async ({ a, b }) => {// ...},);}}See the example ↗ for the full code and as the basis for building your own MCP servers, and the client example ↗ for how to build an Agent that acts as an MCP client.
To learn more, review the announcement blog ↗ as part of Developer Week 2025.
We've made a number of improvements to the Agents SDK, including:
- Support for building MCP servers with the new
MCPAgentclass. - The ability to export the current agent, request and WebSocket connection context using
import { context } from "agents", allowing you to minimize or avoid direct dependency injection when calling tools. - Fixed a bug that prevented query parameters from being sent to the Agent server from the
useAgentReact hook. - Automatically converting the
agentname inuseAgentoruseAgentChatto kebab-case to ensure it matches the naming convention expected byrouteAgentRequest.
To install or update the Agents SDK, run
npm i agents@latestin an existing project, or explore theagents-starterproject:Terminal window npm create cloudflare@latest -- --template cloudflare/agents-starterSee the full release notes and changelog on the Agents SDK repository ↗ and
- Support for building MCP servers with the new
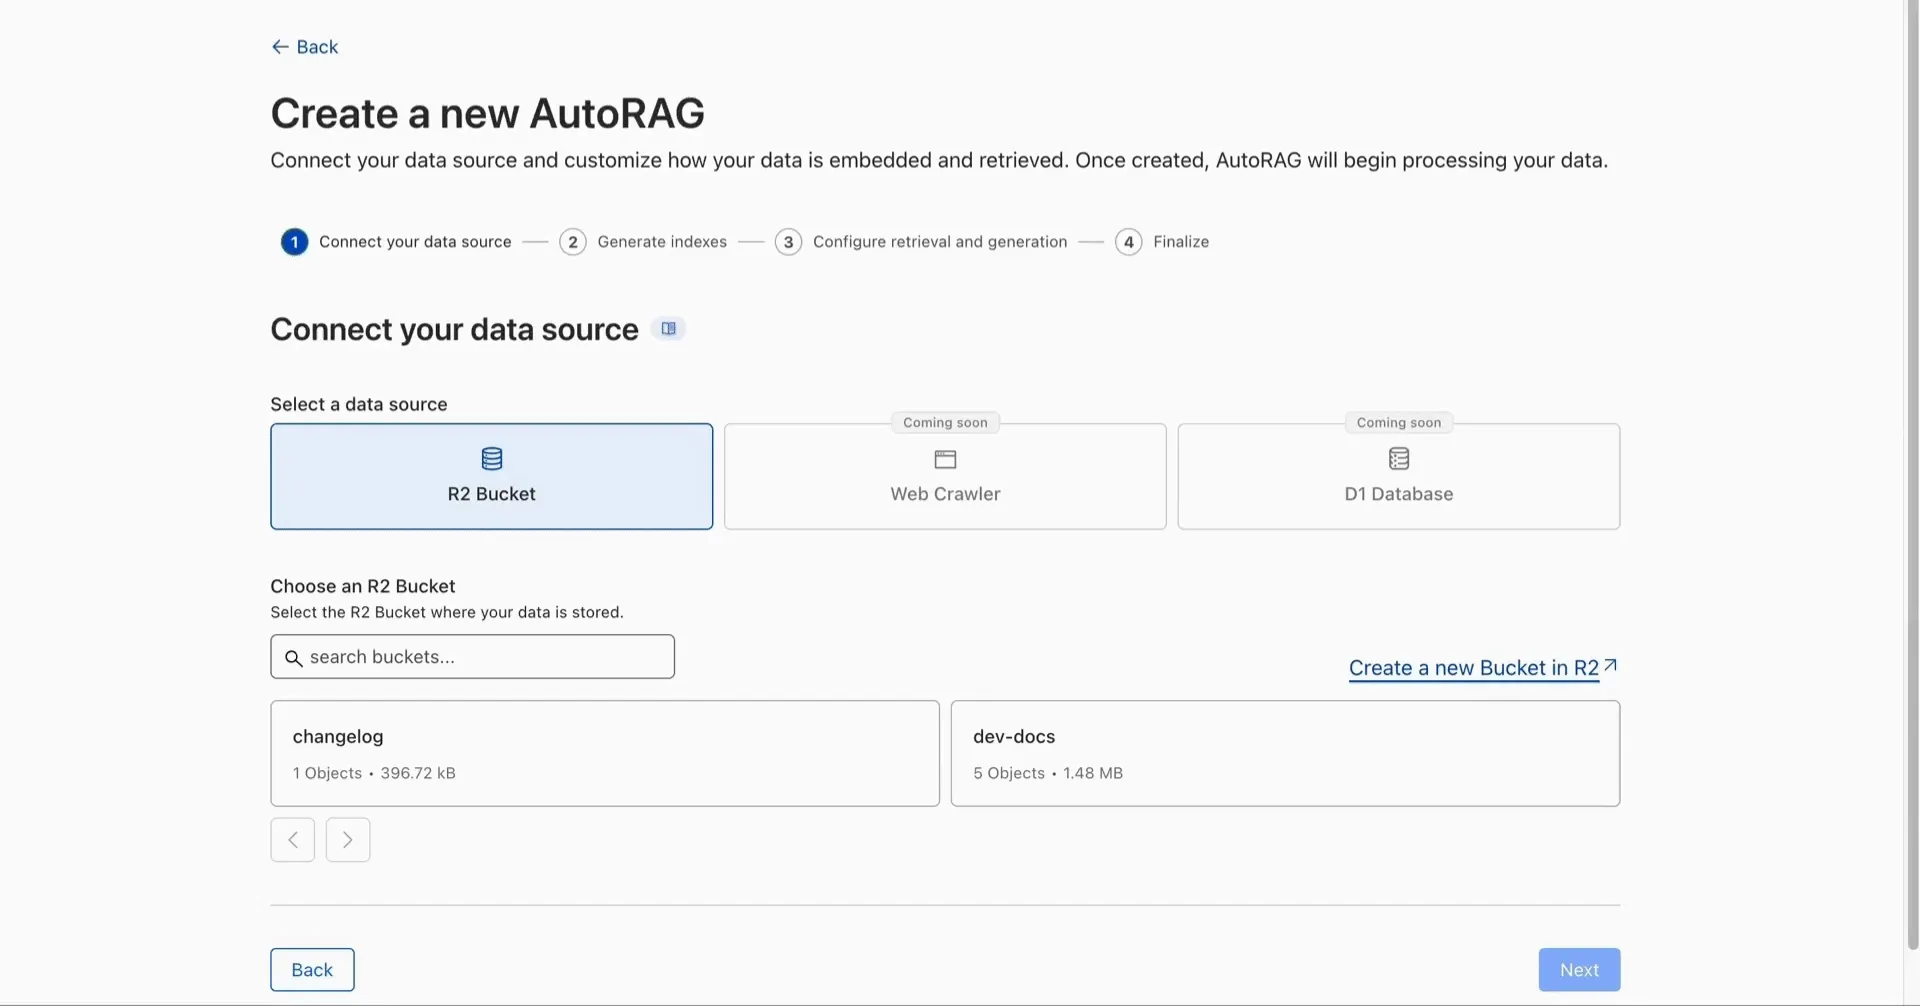
AutoRAG is now in open beta, making it easy for you to build fully-managed retrieval-augmented generation (RAG) pipelines without managing infrastructure. Just upload your docs to R2, and AutoRAG handles the rest: embeddings, indexing, retrieval, and response generation via API.
With AutoRAG, you can:
- Customize your pipeline: Choose from Workers AI models, configure chunking strategies, edit system prompts, and more.
- Instant setup: AutoRAG provisions everything you need from Vectorize, AI gateway, to pipeline logic for you, so you can go from zero to a working RAG pipeline in seconds.
- Keep your index fresh: AutoRAG continuously syncs your index with your data source to ensure responses stay accurate and up to date.
- Ask questions: Query your data and receive grounded responses via a Workers binding or API.
Whether you're building internal tools, AI-powered search, or a support assistant, AutoRAG gets you from idea to deployment in minutes.
Get started in the Cloudflare dashboard ↗ or check out the guide for instructions on how to build your RAG pipeline today.
We’re excited to announce Browser Rendering is now available on the Workers Free plan ↗, making it even easier to prototype and experiment with web search and headless browser use-cases when building applications on Workers.
The Browser Rendering REST API is now Generally Available, allowing you to control browser instances from outside of Workers applications. We've added three new endpoints to help automate more browser tasks:
- Extract structured data – Use
/jsonto retrieve structured data from a webpage. - Retrieve links – Use
/linksto pull all links from a webpage. - Convert to Markdown – Use
/markdownto convert webpage content into Markdown format.
For example, to fetch the Markdown representation of a webpage:
Markdown example curl -X 'POST' 'https://api.cloudflare.com/client/v4/accounts/<accountId>/browser-rendering/markdown' \-H 'Content-Type: application/json' \-H 'Authorization: Bearer <apiToken>' \-d '{"url": "https://example.com"}'For the full list of endpoints, check out our REST API documentation. You can also interact with Browser Rendering via the Cloudflare TypeScript SDK ↗.
We also recently landed support for Playwright in Browser Rendering for browser automation from Cloudflare Workers, in addition to Puppeteer, giving you more flexibility to test across different browser environments.
Visit the Browser Rendering docs to learn more about how to use headless browsers in your applications.
- Extract structured data – Use
Durable Objects can now be used with zero commitment on the Workers Free plan allowing you to build AI agents with Agents SDK, collaboration tools, and real-time applications like chat or multiplayer games.
Durable Objects let you build stateful, serverless applications with millions of tiny coordination instances that run your application code alongside (in the same thread!) your durable storage. Each Durable Object can access its own SQLite database through a Storage API. A Durable Object class is defined in a Worker script encapsulating the Durable Object's behavior when accessed from a Worker. To try the code below, click the button:
JavaScript import { DurableObject } from "cloudflare:workers";// Durable Objectexport class MyDurableObject extends DurableObject {...async sayHello(name) {return `Hello, ${name}!`;}}// Workerexport default {async fetch(request, env) {// Every unique ID refers to an individual instance of the Durable Object classconst id = env.MY_DURABLE_OBJECT.idFromName("foo");// A stub is a client used to invoke methods on the Durable Objectconst stub = env.MY_DURABLE_OBJECT.get(id);// Methods on the Durable Object are invoked via the stubconst response = await stub.sayHello("world");return response;},};Free plan limits apply to Durable Objects compute and storage usage. Limits allow developers to build real-world applications, with every Worker request able to call a Durable Object on the free plan.
For more information, checkout:
SQLite in Durable Objects is now generally available (GA) with 10GB SQLite database per Durable Object. Since the public beta ↗ in September 2024, we've added feature parity and robustness for the SQLite storage backend compared to the preexisting key-value (KV) storage backend for Durable Objects.
SQLite-backed Durable Objects are recommended for all new Durable Object classes, using
new_sqlite_classesWrangler configuration. Only SQLite-backed Durable Objects have access to Storage API's SQL and point-in-time recovery methods, which provide relational data modeling, SQL querying, and better data management.JavaScript export class MyDurableObject extends DurableObject {sql: SqlStorageconstructor(ctx: DurableObjectState, env: Env) {super(ctx, env);this.sql = ctx.storage.sql;}async sayHello() {let result = this.sql.exec("SELECT 'Hello, World!' AS greeting").one();return result.greeting;}}KV-backed Durable Objects remain for backwards compatibility, and a migration path from key-value storage to SQL storage for existing Durable Object classes will be offered in the future.
For more details on SQLite storage, checkout Zero-latency SQLite storage in every Durable Object blog ↗.
Workflows is now Generally Available (or "GA"): in short, it's ready for production workloads. Alongside marking Workflows as GA, we've introduced a number of changes during the beta period, including:
- A new
waitForEventAPI that allows a Workflow to wait for an event to occur before continuing execution. - Increased concurrency: you can run up to 4,500 Workflow instances concurrently — and this will continue to grow.
- Improved observability, including new CPU time metrics that allow you to better understand which Workflow instances are consuming the most resources and/or contributing to your bill.
- Support for
vitestfor testing Workflows locally and in CI/CD pipelines.
Workflows also supports the new increased CPU limits that apply to Workers, allowing you to run more CPU-intensive tasks (up to 5 minutes of CPU time per instance), not including the time spent waiting on network calls, AI models, or other I/O bound tasks.
The new
step.waitForEventAPI allows a Workflow instance to wait on events and data, enabling human-in-the-the-loop interactions, such as approving or rejecting a request, directly handling webhooks from other systems, or pushing event data to a Workflow while it's running.Because Workflows are just code, you can conditionally execute code based on the result of a
waitForEventcall, and/or callwaitForEventmultiple times in a single Workflow based on what the Workflow needs.For example, if you wanted to implement a human-in-the-loop approval process, you could use
waitForEventto wait for a user to approve or reject a request, and then conditionally execute code based on the result.JavaScript import {WorkflowEntrypoint,WorkflowStep,WorkflowEvent,} from "cloudflare:workers";export class MyWorkflow extends WorkflowEntrypoint {async run(event, step) {// Other steps in your Workflowlet stripeEvent = await step.waitForEvent("receive invoice paid webhook from Stripe",{ type: "stripe-webhook", timeout: "1 hour" },);// Rest of your Workflow}}TypeScript import { WorkflowEntrypoint, WorkflowStep, WorkflowEvent } from "cloudflare:workers";export class MyWorkflow extends WorkflowEntrypoint<Env, Params> {async run(event: WorkflowEvent<Params>, step: WorkflowStep) {// Other steps in your Workflowlet stripeEvent = await step.waitForEvent<IncomingStripeWebhook>("receive invoice paid webhook from Stripe", { type: "stripe-webhook", timeout: "1 hour" })// Rest of your Workflow}}You can then send a Workflow an event from an external service via HTTP or from within a Worker using the Workers API for Workflows:
JavaScript export default {async fetch(req, env) {const instanceId = new URL(req.url).searchParams.get("instanceId");const webhookPayload = await req.json();let instance = await env.MY_WORKFLOW.get(instanceId);// Send our event, with `type` matching the event type defined in// our step.waitForEvent callawait instance.sendEvent({type: "stripe-webhook",payload: webhookPayload,});return Response.json({status: await instance.status(),});},};TypeScript export default {async fetch(req: Request, env: Env) {const instanceId = new URL(req.url).searchParams.get("instanceId")const webhookPayload = await req.json<Payload>()let instance = await env.MY_WORKFLOW.get(instanceId);// Send our event, with `type` matching the event type defined in// our step.waitForEvent callawait instance.sendEvent({type: "stripe-webhook", payload: webhookPayload})return Response.json({status: await instance.status(),});},};Read the GA announcement blog ↗ to learn more about what landed as part of the Workflows GA.
- A new
You can now capture a maximum of 256 KB of log events per Workers invocation, helping you gain better visibility into application behavior.
All console.log() statements, exceptions, request metadata, and headers are automatically captured during the Worker invocation and emitted as JSON object. Workers Logs deserializes this object before indexing the fields and storing them. You can also capture, transform, and export the JSON object in a Tail Worker.
256 KB is a 2x increase from the previous 128 KB limit. After you exceed this limit, further context associated with the request will not be recorded in your logs.
This limit is automatically applied to all Workers.
We're excited to share that you can now use Playwright's browser automation capabilities ↗ from Cloudflare Workers.
Playwright ↗ is an open-source package developed by Microsoft that can do browser automation tasks; it's commonly used to write software tests, debug applications, create screenshots, and crawl pages. Like Puppeteer, we forked ↗ Playwright and modified it to be compatible with Cloudflare Workers and Browser Rendering ↗.
Below is an example of how to use Playwright with Browser Rendering to test a TODO application using assertions:
Assertion example import { launch, type BrowserWorker } from "@cloudflare/playwright";import { expect } from "@cloudflare/playwright/test";interface Env {MYBROWSER: BrowserWorker;}export default {async fetch(request: Request, env: Env) {const browser = await launch(env.MYBROWSER);const page = await browser.newPage();await page.goto("https://demo.playwright.dev/todomvc");const TODO_ITEMS = ["buy some cheese","feed the cat","book a doctors appointment",];const newTodo = page.getByPlaceholder("What needs to be done?");for (const item of TODO_ITEMS) {await newTodo.fill(item);await newTodo.press("Enter");}await expect(page.getByTestId("todo-title")).toHaveCount(TODO_ITEMS.length);await Promise.all(TODO_ITEMS.map((value, index) =>expect(page.getByTestId("todo-title").nth(index)).toHaveText(value),),);},};Playwright is available as an npm package at
@cloudflare/playwright↗ and the code is at GitHub ↗.Learn more in our documentation.
You can now programmatically override Cache Rules using the
cfobject in thefetch()command. This feature gives you fine-grained control over caching behavior on a per-request basis, allowing Workers to customize cache settings dynamically based on request properties, user context, or business logic.Using the
cfobject infetch(), you can override specific Cache Rules settings by:- Setting custom cache options: Pass cache properties in the
cfobject as the second argument tofetch()to override default Cache Rules. - Dynamic cache control: Apply different caching strategies based on request headers, cookies, or other runtime conditions.
- Per-request customization: Bypass or modify Cache Rules for individual requests while maintaining default behavior for others.
- Programmatic cache management: Implement complex caching logic that adapts to your application's needs.
Workers can override the following Cache Rules settings through the
cfobject:cacheEverything: Treat all content as static and cache all file types beyond the default cached content.cacheTtl: Set custom time-to-live values in seconds for cached content at the edge, regardless of origin headers.cacheTtlByStatus: Set different TTLs based on the response status code (for example,{ "200-299": 86400, 404: 1, "500-599": 0 }).cacheKey: Customize cache keys to control which requests are treated as the same for caching purposes (Enterprise only).cacheTags: Append additional cache tags for targeted cache purging operations.
- Enhanced flexibility: Customize cache behavior without modifying zone-level Cache Rules.
- Dynamic optimization: Adjust caching strategies in real-time based on request context.
- Simplified configuration: Reduce the number of Cache Rules needed by handling edge cases programmatically.
- Improved performance: Fine-tune cache behavior for specific use cases to maximize hit rates.
To get started, refer to the Workers Fetch API documentation and the cf object properties documentation.
- Setting custom cache options: Pass cache properties in the
You can now access all Cloudflare cache purge methods — no matter which plan you’re on. Whether you need to update a single asset or instantly invalidate large portions of your site’s content, you now have the same powerful tools previously reserved for Enterprise customers.
Anyone on Cloudflare can now:
- Purge Everything: Clears all cached content associated with a website.
- Purge by Prefix: Targets URLs sharing a common prefix.
- Purge by Hostname: Invalidates content by specific hostnames.
- Purge by URL (single-file purge): Precisely targets individual URLs.
- Purge by Tag: Uses Cache-Tag response headers to invalidate grouped assets, offering flexibility for complex cache management scenarios.
Want to learn how each purge method works, when to use them, or what limits apply to your plan? Dive into our purge cache documentation and API reference ↗ for all the details.
Ruleset Rule ID Legacy Rule ID Description Previous Action New Action Comments Cloudflare Managed Ruleset 100732 Sitecore - Code Injection - CVE:CVE-2025-27218 Log Block This is a New Detection Cloudflare Managed Ruleset 100733 Angular-Base64-Upload - Remote Code Execution - CVE:CVE-2024-42640
Log Block This is a New Detection Cloudflare Managed Ruleset 100734 Apache Camel - Remote Code Execution - CVE:CVE-2025-29891 Log Disabled This is a New Detection Cloudflare Managed Ruleset 100735 Progress Software WhatsUp Gold - Remote Code Execution - CVE:CVE-2024-4885
Log Block This is a New Detection Cloudflare Managed Ruleset 100737 Apache Tomcat - Remote Code Execution - CVE:CVE-2025-24813 Log Block This is a New Detection Cloudflare Managed Ruleset 100659 Common Payloads for Server-side Template Injection N/A Disabled N/A Cloudflare Managed Ruleset 100659 Common Payloads for Server-side Template Injection - Base64 N/A Disabled N/A Cloudflare Managed Ruleset 100642 LDAP Injection N/A Disabled N/A Cloudflare Managed Ruleset 100642 LDAP Injection Base64 N/A Disabled N/A Cloudflare Managed Ruleset 100005 DotNetNuke - File Inclusion - CVE:CVE-2018-9126, CVE:CVE-2011-1892, CVE:CVE-2022-31474
N/A Disabled N/A Cloudflare Managed Ruleset 100527 Apache Struts - CVE:CVE-2021-31805 N/A Block N/A Cloudflare Managed Ruleset 100702 Command Injection - CVE:CVE-2022-24108 N/A Block N/A Cloudflare Managed Ruleset 100622C Ivanti - Command Injection - CVE:CVE-2023-46805, CVE:CVE-2024-21887, CVE:CVE-2024-22024
N/A Block N/A Cloudflare Managed Ruleset 100536C GraphQL Command Injection N/A Disabled N/A Cloudflare Managed Ruleset 100536 GraphQL Injection N/A Disabled N/A Cloudflare Managed Ruleset 100536A GraphQL Introspection N/A Disabled N/A Cloudflare Managed Ruleset 100536B GraphQL SSRF N/A Disabled N/A Cloudflare Managed Ruleset 100559A Prototype Pollution - Common Payloads N/A Disabled N/A Cloudflare Managed Ruleset 100559A Prototype Pollution - Common Payloads - Base64 N/A Disabled N/A Cloudflare Managed Ruleset 100734 Apache Camel - Remote Code Execution - CVE:CVE-2025-29891 N/A Disabled N/A
With Email security, you get two free CASB integrations.
Use one SaaS integration for Email security to sync with your directory of users, take actions on delivered emails, automatically provide EMLs for reclassification requests for clean emails, discover CASB findings and more.
With the other integration, you can have a separate SaaS integration for CASB findings for another SaaS provider.
Refer to Add an integration to learn more about this feature.

This feature is available across these Email security packages:
- Enterprise
- Enterprise + PhishGuard
A new GA release for the macOS WARP client is now available on the stable releases downloads page.
This release contains support for a new WARP setting, Global WARP override. It also includes significant improvements to our captive portal / public Wi-Fi detection logic. If you have experienced captive portal issues in the past, re-test and give this version a try.
Changes and improvements
- Improved captive portal detection to make more public networks compatible and have faster detection.
- Improved error messages shown in the app.
- WARP tunnel protocol details can now be viewed using the
warp-cli tunnel statscommand. - Fixed an issue with device revocation and re-registration when switching configurations.
- Added a new Global WARP override setting. This setting puts account administrators in control of disabling and enabling WARP across all devices registered to an account from the dashboard. Global WARP override is disabled by default.
Known issues
- macOS Sequoia: Due to changes Apple introduced in macOS 15.0.x, the WARP client may not behave as expected. Cloudflare recommends the use of macOS 15.3 or later.
A new GA release for the Windows WARP client is now available on the stable releases downloads page.
This release contains support for a new WARP setting, Global WARP override. It also includes significant improvements to our captive portal / public Wi-Fi detection logic. If you have experienced captive portal issues in the past, re-test and give this version a try.
Changes and improvements
- Improved captive portal detection to make more public networks compatible and have faster detection.
- Improved error messages shown in the app.
- Added the ability to control if the WARP interface IPs are registered with DNS servers or not.
- Removed DNS logs view from the Windows client GUI. DNS logs can be viewed as part of
warp-diagor by viewing the log file on the user's local directory. - Fixed an issue that would result in a user receiving multiple re-authentication requests when waking their device from sleep.
- WARP tunnel protocol details can now be viewed using the
warp-cli tunnel statscommand. - Improvements to Windows multi-user including support for fast user switching. If you are interested in testing this feature, reach out to your Cloudflare account team.
- Fixed an issue with device revocation and re-registration when switching configurations.
- Fixed an issue where DEX tests would run during certain sleep states where the networking stack was not fully up. This would result in failures that would be ignored.
- Added a new Global WARP override setting. This setting puts account administrators in control of disabling and enabling WARP across all devices registered to an account from the dashboard. Global WARP override is disabled by default.
Known issues
DNS resolution may be broken when the following conditions are all true:
- WARP is in Secure Web Gateway without DNS filtering (tunnel-only) mode.
- A custom DNS server address is configured on the primary network adapter.
- The custom DNS server address on the primary network adapter is changed while WARP is connected.
To work around this issue, reconnect the WARP client by toggling off and back on.
A new GA release for the Linux WARP client is now available on the stable releases downloads page.
This release contains support for a new WARP setting, Global WARP override. It also includes significant improvements to our captive portal / public Wi-Fi detection logic. If you have experienced captive portal issues in the past, re-test and give this version a try.
Changes and improvements
- Improved captive portal detection to make more public networks compatible and have faster detection.
- WARP tunnel protocol details can now be viewed using the
warp-cli tunnel statscommand. - Fixed an issue with device revocation and re-registration when switching configurations.
- Added a new Global WARP override setting. This setting puts account administrators in control of disabling and enabling WARP across all devices registered to an account from the dashboard. Global WARP override is disabled by default.
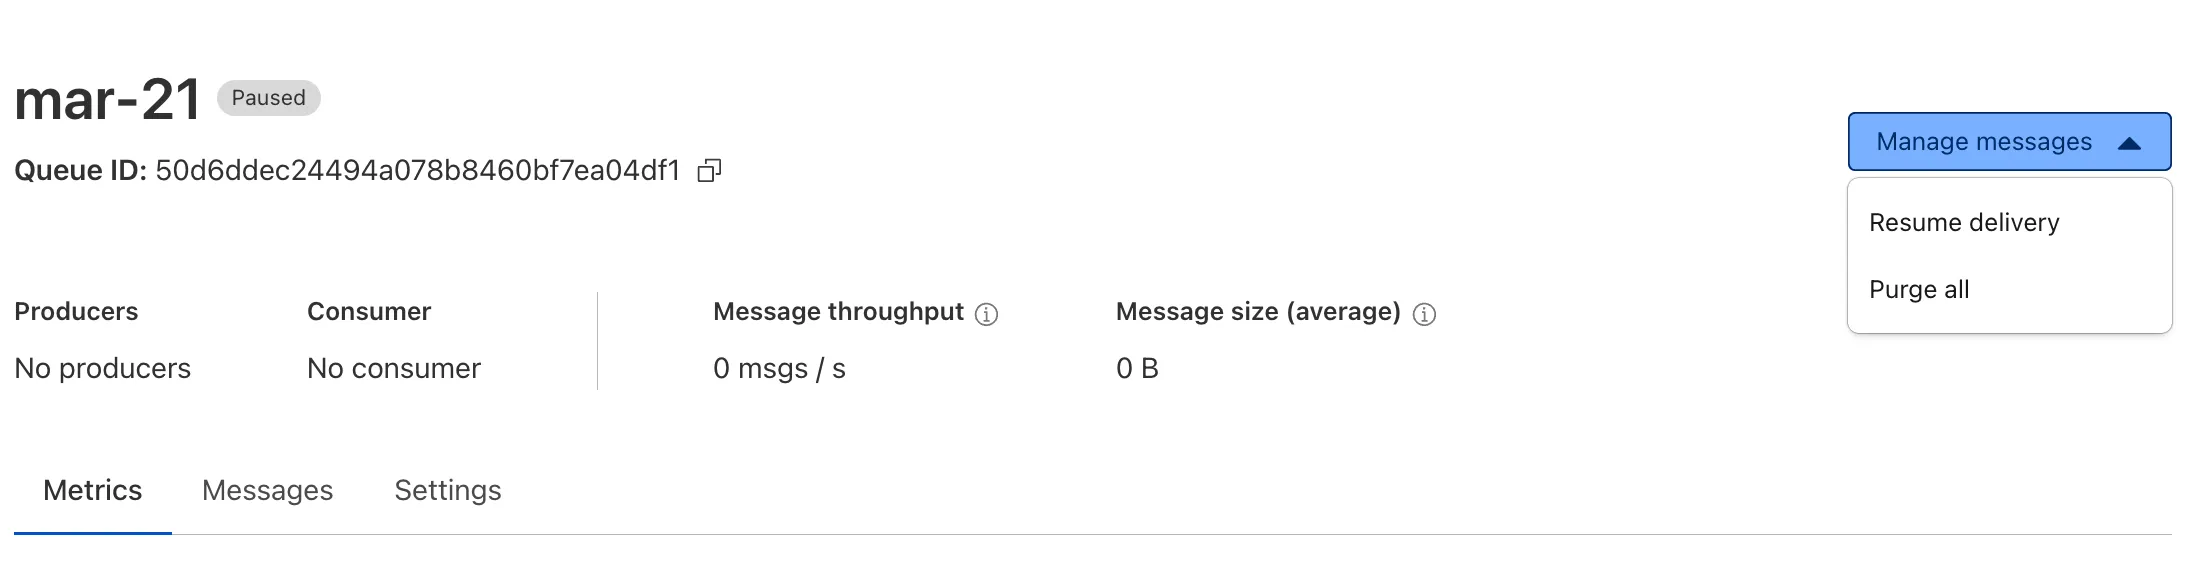
Queues now supports the ability to pause message delivery and/or purge (delete) messages on a queue. These operations can be useful when:
- Your consumer has a bug or downtime, and you want to temporarily stop messages from being processed while you fix the bug
- You have pushed invalid messages to a queue due to a code change during development, and you want to clean up the backlog
- Your queue has a backlog that is stale and you want to clean it up to allow new messages to be consumed
To pause a queue using Wrangler, run the
pause-deliverycommand. Paused queues continue to receive messages. And you can easily unpause a queue using theresume-deliverycommand.Pause and resume a queue $ wrangler queues pause-delivery my-queuePausing message delivery for queue my-queue.Paused message delivery for queue my-queue.$ wrangler queues resume-delivery my-queueResuming message delivery for queue my-queue.Resumed message delivery for queue my-queue.Purging a queue permanently deletes all messages in the queue. Unlike pausing, purging is an irreversible operation:
Purge a queue $ wrangler queues purge my-queue✔ This operation will permanently delete all the messages in queue my-queue. Type my-queue to proceed. … my-queuePurged queue 'my-queue'You can also do these operations using the Queues REST API, or the dashboard page for a queue.
This feature is available on all new and existing queues. Head over to the pause and purge documentation to learn more. And if you haven't used Cloudflare Queues before, get started with the Cloudflare Queues guide.
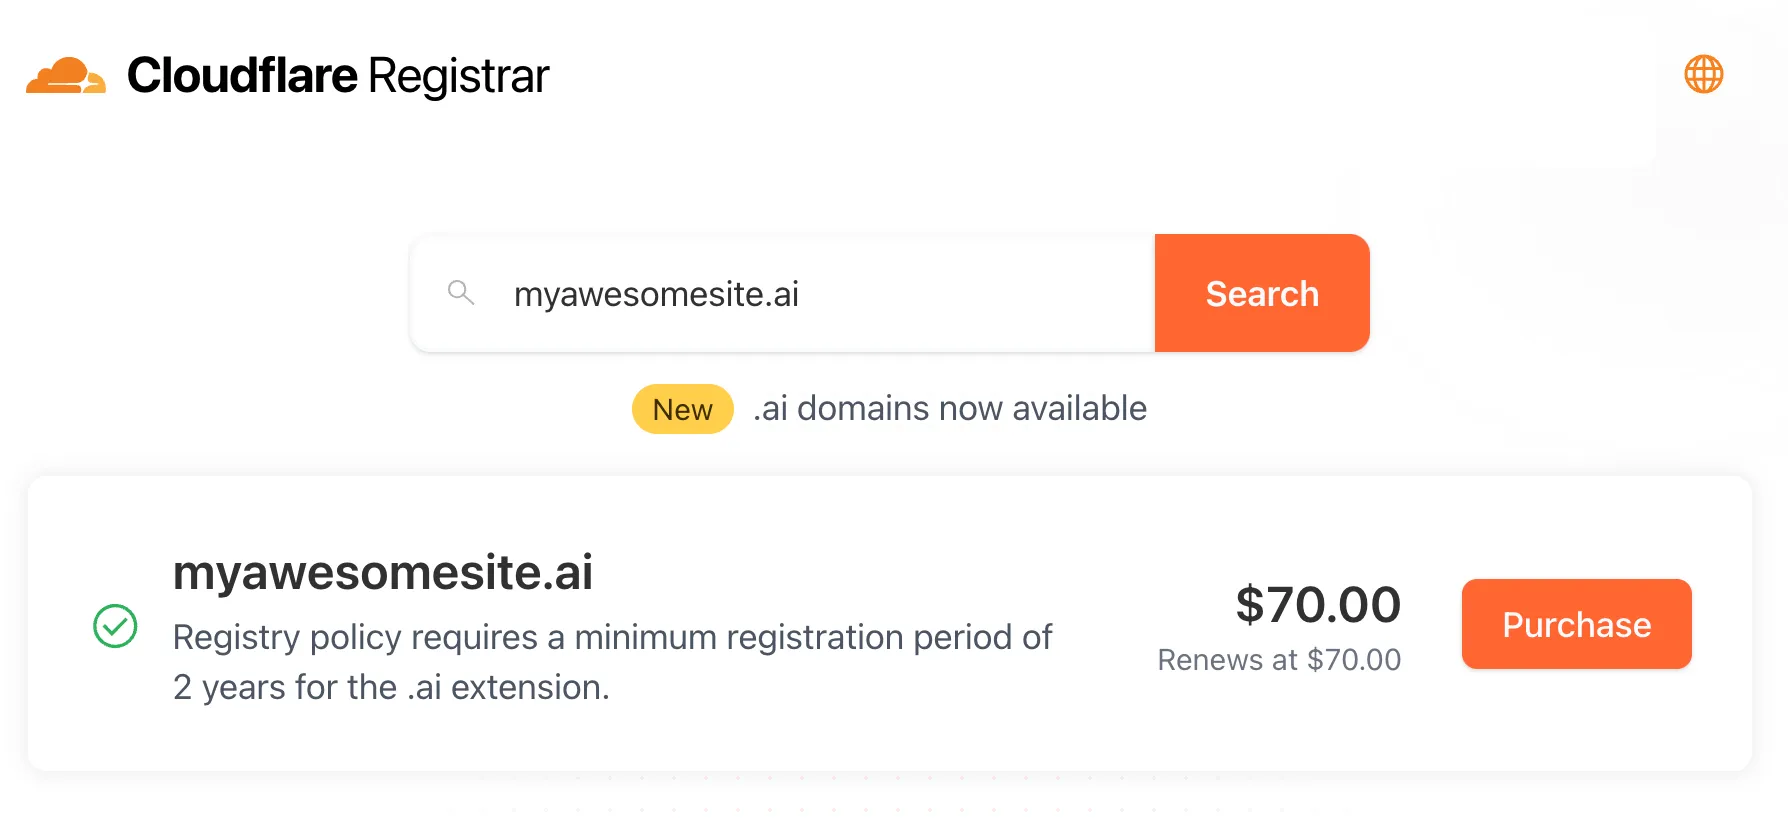
Cloudflare Registrar now supports
.aiand.shopdomains. These are two of our most highly-requested top-level domains (TLDs) and are great additions to the 300+ other TLDs we support ↗.Starting today, customers can:
- Register and renew these domains at cost without any markups or add-on fees
- Enjoy best-in-class security and performance with native integrations with Cloudflare DNS, CDN, and SSL services like one-click DNSSEC
- Combat domain hijacking with Custom Domain Protection ↗ (available on enterprise plans)
We can't wait to see what AI and e-commerce projects you deploy on Cloudflare. To get started, transfer your domains to Cloudflare or search for new ones to register ↗.
The latest version of audit logs streamlines audit logging by automatically capturing all user and system actions performed through the Cloudflare Dashboard or public APIs. This update leverages Cloudflare’s existing API Shield to generate audit logs based on OpenAPI schemas, ensuring a more consistent and automated logging process.
Availability: Audit logs (version 2) is now in Beta, with support limited to API access.
Use the following API endpoint to retrieve audit logs:
JavaScript GET https://api.cloudflare.com/client/v4/accounts/<account_id>/logs/audit?since=<date>&before=<date>You can access detailed documentation for audit logs (version 2) Beta API release here ↗.
Key Improvements in the Beta Release:
-
Automated & standardized logging: Logs are now generated automatically using a standardized system, replacing manual, team-dependent logging. This ensures consistency across all Cloudflare services.
-
Expanded product coverage: Increased audit log coverage from 75% to 95%. Key API endpoints such as
/accounts,/zones, and/organizationsare now included. -
Granular filtering: Logs now follow a uniform format, enabling precise filtering by actions, users, methods, and resources—allowing for faster and more efficient investigations.
-
Enhanced context and traceability: Each log entry now includes detailed context, such as the authentication method used, the interface (API or Dashboard) through which the action was performed, and mappings to Cloudflare Ray IDs for better traceability.
-
Comprehensive activity capture: Expanded logging to include GET requests and failed attempts, ensuring that all critical activities are recorded.
Known Limitations in Beta
- Error handling for the API is not implemented.
- There may be gaps or missing entries in the available audit logs.
- UI is unavailable in this Beta release.
- System-level logs and User-Activity logs are not included.
Support for these features is coming as part of the GA release later this year. For more details, including a sample audit log, check out our blog post: Introducing Automatic Audit Logs ↗
-
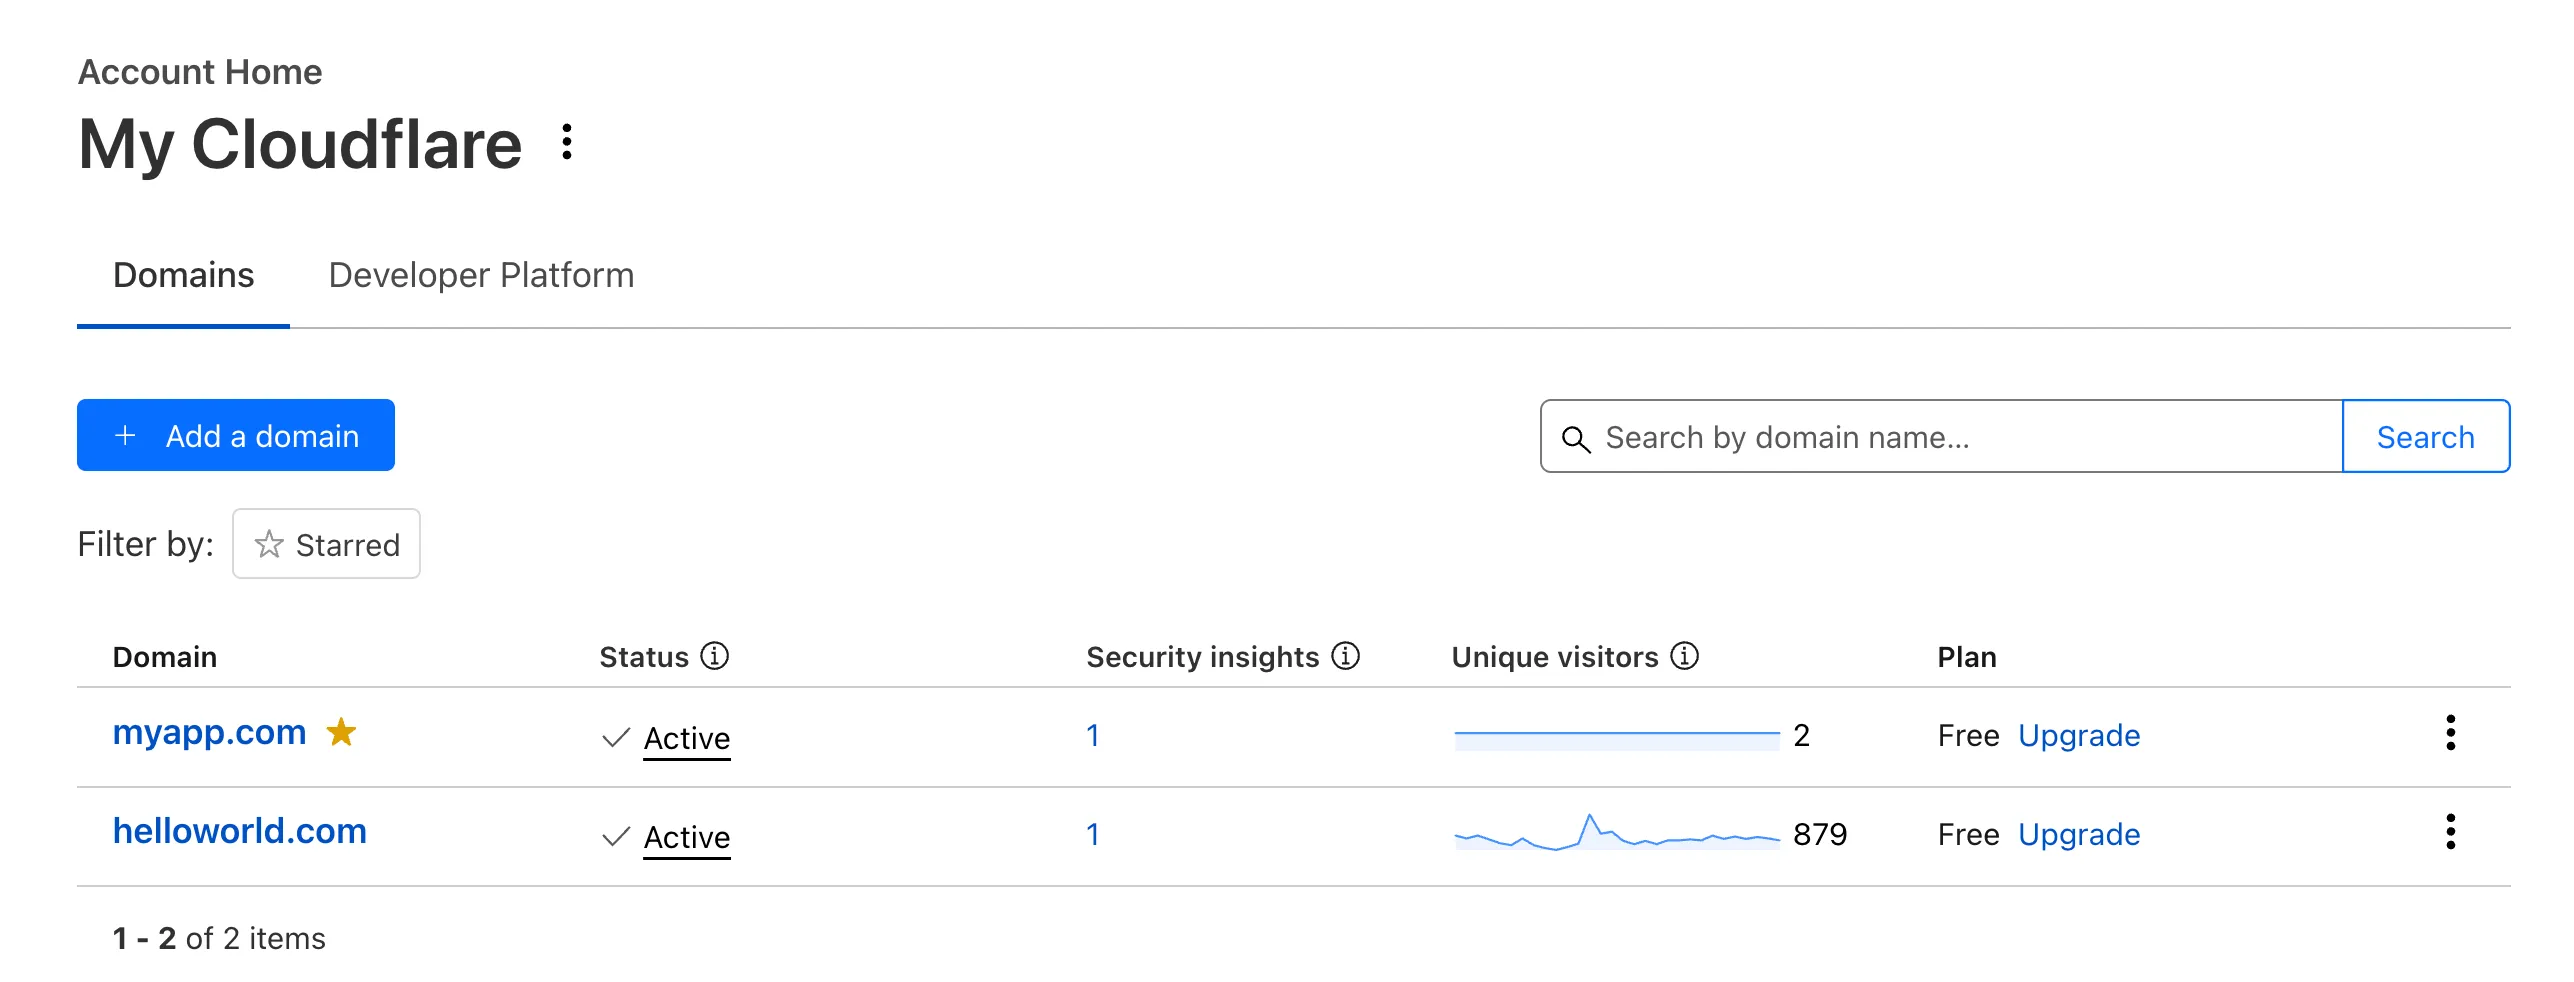
Recently, Account Home has been updated to streamline your workflows:
-
Recent Workers projects: You'll now find your projects readily accessible from a new
Developer Platformtab on Account Home. See recently-modified projects and explore what you can work our developer-focused products. -
Traffic and security insights: Get a snapshot of domain performance at a glance with key metrics and trends.
-
Quick actions: You can now perform common actions for your account, domains, and even Workers in just 1-2 clicks from the 3-dot menu.
-
Keep starred domains front and center: Now, when you filter for starred domains on Account Home, we'll save your preference so you'll continue to only see starred domains by default.
We can't wait for you to take the new Account Home for a spin.
For more info:
-
You can now run a Worker for up to 5 minutes of CPU time for each request.
Previously, each Workers request ran for a maximum of 30 seconds of CPU time — that is the time that a Worker is actually performing a task (we still allowed unlimited wall-clock time, in case you were waiting on slow resources). This meant that some compute-intensive tasks were impossible to do with a Worker. For instance, you might want to take the cryptographic hash of a large file from R2. If this computation ran for over 30 seconds, the Worker request would have timed out.
By default, Workers are still limited to 30 seconds of CPU time. This protects developers from incurring accidental cost due to buggy code.
By changing the
cpu_msvalue in your Wrangler configuration, you can opt in to any value up to 300,000 (5 minutes).{// ...rest of your configuration..."limits": {"cpu_ms": 300000,},// ...rest of your configuration...}[limits]cpu_ms = 300_000For more information on the updates limits, see the documentation on Wrangler configuration for
cpu_msand on Workers CPU time limits.For building long-running tasks on Cloudflare, we also recommend checking out Workflows and Queues.
Source maps are now Generally Available (GA). You can now be uploaded with a maximum gzipped size of 15 MB. Previously, the maximum size limit was 15 MB uncompressed.
Source maps help map between the original source code and the transformed/minified code that gets deployed to production. By uploading your source map, you allow Cloudflare to map the stack trace from exceptions onto the original source code making it easier to debug.

With no source maps uploaded: notice how all the Javascript has been minified to one file, so the stack trace is missing information on file name, shows incorrect line numbers, and incorrectly references
jsinstead ofts.
With source maps uploaded: all methods reference the correct files and line numbers.
Uploading source maps and stack trace remapping happens out of band from the Worker execution, so source maps do not affect upload speed, bundle size, or cold starts. The remapped stack traces are accessible through Tail Workers, Workers Logs, and Workers Logpush.
To enable source maps, add the following to your Pages Function's or Worker's wrangler configuration:
{"upload_source_maps": true}upload_source_maps = true