Example Site
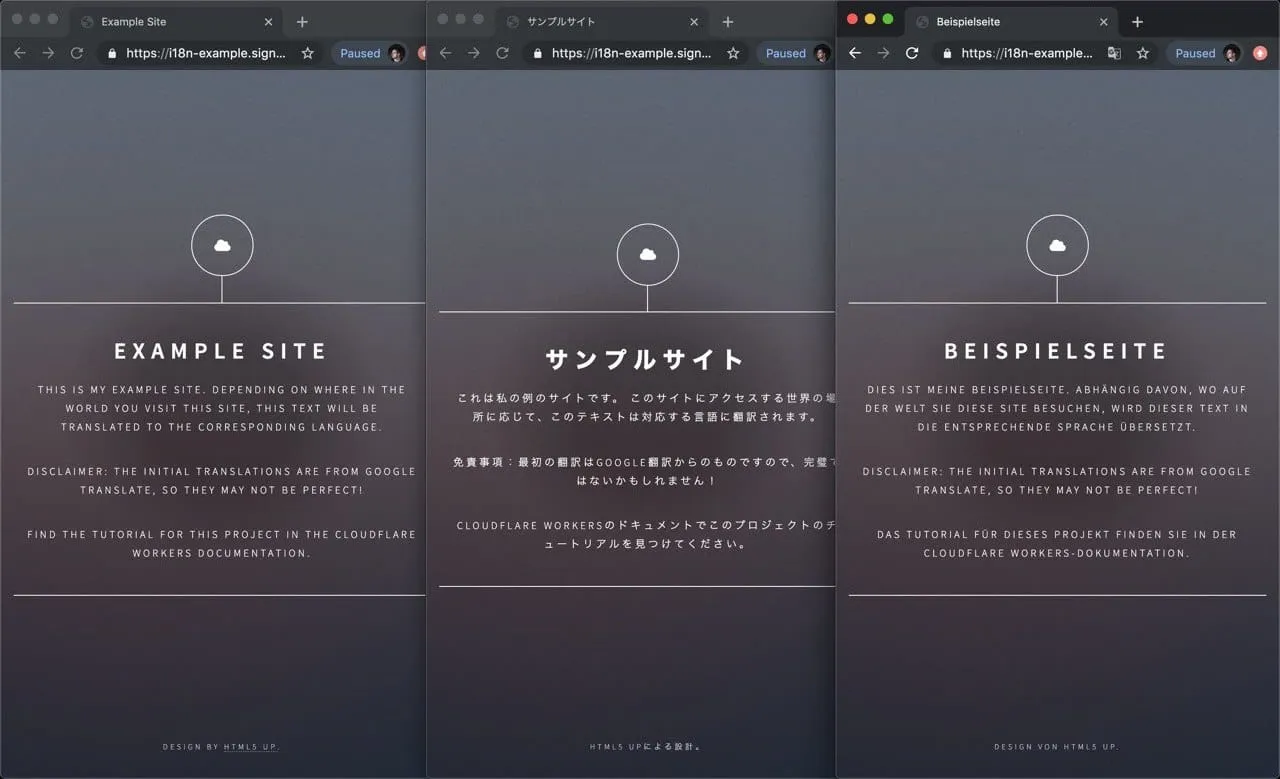
This is my example site. Depending o...
Disclaimer: the initial translations...
```
Using `HTMLRewriter`, you will parse the HTML within the `./public/index.html` page. When a `data-i18n-key` attribute is found, you should use the attribute's value to retrieve a matching translation from the `strings` object. With `HTMLRewriter`, you can query elements to accomplish tasks like finding a data attribute. However, as the name suggests, you can also rewrite elements by taking a translated string and directly inserting it into the HTML.
Another feature of this project is based on the `Accept-Language` header, which exists on incoming requests. You can set the translation language per request, allowing users from around the world to see a locally relevant and translated page.
## Using the HTML Rewriter API
Begin with the `functions/index.js` file. Your application in this tutorial will live entirely in this file.
Inside of this file, start by adding the default code for running a [Pages Function](https://developers.cloudflare.com/pages/functions/get-started/#create-a-function).
JavaScript
```
export function onRequest(context) {
return new Response("Hello, world!");
}
```
The important part of the code lives in the `onRequest` function. To implement translations on the site, take the HTML response retrieved from `env.ASSETS.fetch(request)` this allows you to fetch a static asset from your Pages project and pass it into a new instance of `HTMLRewriter`. When instantiating `HTMLRewriter`, you can attach handlers using the `on` function. For this tutorial, you will use the `[data-i18n-key]` selector (refer to the [HTMLRewriter documentation](https://developers.cloudflare.com/workers/runtime-apis/html-rewriter/) for more advanced usage) to locate all elements with the `data-i18n-key` attribute, which means that they must be translated. Any matching element will be passed to an instance of your `ElementHandler` class, which will contain the translation logic. With the created instance of `HTMLRewriter`, the `transform` function takes a `response` and can be returned to the client:
JavaScript
```
export async function onRequest(context) {
const { request, env } = context;
const response = await env.ASSETS.fetch(request);
return new HTMLRewriter()
.on("[data-i18n-key]", new ElementHandler(countryStrings))
.transform(response);
}
```
## Transforming HTML
Your `ElementHandler` will receive every element parsed by the `HTMLRewriter` instance, and due to the expressive API, you can query each incoming element for information.
In [How it works](#understanding-data-i18n-key), the documentation describes `data-i18n-key`, a custom data attribute that could be used to find a corresponding translated string for the website’s user interface. In `ElementHandler`, you can define an `element` function, which will be called as each element is parsed. Inside of the `element` function, you can query for the custom data attribute using `getAttribute`:
JavaScript
```
class ElementHandler {
element(element) {
const i18nKey = element.getAttribute("data-i18n-key");
}
}
```
With `i18nKey` defined, you can use it to search for a corresponding translated string. You will now set up a `strings` object with key-value pairs corresponding to the `data-i18n-key` value. For now, you will define a single example string, `headline`, with a German `string`, `"Beispielseite"` (`"Example Site"`), and retrieve it in the `element` function:
JavaScript
```
const strings = {
headline: "Beispielseite",
};
class ElementHandler {
element(element) {
const i18nKey = element.getAttribute("data-i18n-key");
const string = strings[i18nKey];
}
}
```
Take your translated `string` and insert it into the original element, using the `setInnerContent` function:
JavaScript
```
const strings = {
headline: "Beispielseite",
};
class ElementHandler {
element(element) {
const i18nKey = element.getAttribute("data-i18n-key");
const string = strings[i18nKey];
if (string) {
element.setInnerContent(string);
}
}
}
```
To review that everything looks as expected, use the preview functionality built into Wrangler. Call [wrangler pages dev ./public](https://developers.cloudflare.com/workers/wrangler/commands/general/#dev) to open up a live preview of your project. The command is refreshed after every code change that you make.
You can expand on this translation functionality to provide country-specific translations, based on the incoming request’s `Accept-Language` header. By taking this header, parsing it, and passing the parsed language into your `ElementHandler`, you can retrieve a translated string in your user’s home language, provided that it is defined in `strings`.
To implement this:
1. Update the `strings` object, adding a second layer of key-value pairs and allowing strings to be looked up in the format `strings[country][key]`.
2. Pass a `countryStrings` object into our `ElementHandler`, so that it can be used during the parsing process.
3. Grab the `Accept-Language` header from an incoming request, parse it, and pass the parsed language to `ElementHandler`.
To parse the `Accept-Language` header, install the [accept-language-parser ↗](https://www.npmjs.com/package/accept-language-parser) npm package:
Terminal window
```
npm i accept-language-parser
```
Once imported into your code, use the package to parse the most relevant language for a client based on `Accept-Language` header, and pass it to `ElementHandler`. Your final code for the project, with an included sample translation for Germany and Japan (using Google Translate) looks like this:
JavaScript
```
import parser from "accept-language-parser";
// do not set to true in production!
const DEBUG = false;
const strings = {
de: {
title: "Beispielseite",
headline: "Beispielseite",
subtitle:
"Dies ist meine Beispielseite. Abhängig davon, wo auf der Welt Sie diese Site besuchen, wird dieser Text in die entsprechende Sprache übersetzt.",
disclaimer:
"Haftungsausschluss: Die anfänglichen Übersetzungen stammen von Google Translate, daher sind sie möglicherweise nicht perfekt!",
tutorial:
"Das Tutorial für dieses Projekt finden Sie in der Cloudflare Workers-Dokumentation.",
copyright: "Design von HTML5 UP.",
},
ja: {
title: "サンプルサイト",
headline: "サンプルサイト",
subtitle:
"これは私の例のサイトです。 このサイトにアクセスする世界の場所に応じて、このテキストは対応する言語に翻訳されます。",
disclaimer:
"免責事項:最初の翻訳はGoogle翻訳からのものですので、完璧ではないかもしれません!",
tutorial:
"Cloudflare Workersのドキュメントでこのプロジェクトのチュートリアルを見つけてください。",
copyright: "HTML5 UPによる設計。",
},
};
class ElementHandler {
constructor(countryStrings) {
this.countryStrings = countryStrings;
}
element(element) {
const i18nKey = element.getAttribute("data-i18n-key");
if (i18nKey) {
const translation = this.countryStrings[i18nKey];
if (translation) {
element.setInnerContent(translation);
}
}
}
}
export async function onRequest(context) {
const { request, env } = context;
try {
let options = {};
if (DEBUG) {
options = {
cacheControl: {
bypassCache: true,
},
};
}
const languageHeader = request.headers.get("Accept-Language");
const language = parser.pick(["de", "ja"], languageHeader);
const countryStrings = strings[language] || {};
const response = await env.ASSETS.fetch(request);
return new HTMLRewriter()
.on("[data-i18n-key]", new ElementHandler(countryStrings))
.transform(response);
} catch (e) {
if (DEBUG) {
return new Response(e.message || e.toString(), {
status: 404,
});
} else {
return env.ASSETS.fetch(request);
}
}
}
```
## Deploy
Your i18n tool built on Cloudflare Pages is complete and it is time to deploy it to your domain.
To deploy your application to a `*.pages.dev` subdomain, you need to specify a directory of static assets to serve, configure the `pages_build_output_dir` in your project’s Wrangler file and set the value to `./public`:
* [ wrangler.jsonc ](#tab-panel-7122)
* [ wrangler.toml ](#tab-panel-7123)
JSONC
```
{
"$schema": "./node_modules/wrangler/config-schema.json",
"name": "i18n-example",
"pages_build_output_dir": "./public",
// Set this to today's date
"compatibility_date": "2026-05-08"
}
```
TOML
```
"$schema" = "./node_modules/wrangler/config-schema.json"
name = "i18n-example"
pages_build_output_dir = "./public"
# Set this to today's date
compatibility_date = "2026-05-08"
```
Next, you need to configure a deploy script in `package.json` file in your project. Add a deploy script with the value `wrangler pages deploy`:
```
"scripts": {
"dev": "wrangler pages dev",
"deploy": "wrangler pages deploy"
}
```
Using `wrangler`, deploy to Cloudflare’s network, using the `deploy` command:
Terminal window
```
npm run deploy
```
## Related resources
In this tutorial, you built and deployed an i18n tool using `HTMLRewriter`. To review the full source code for this application, refer to the [repository on GitHub ↗](https://github.com/lauragift21/i18n-example-workers).
If you want to get started building your own projects, review the existing list of [Quickstart templates](https://developers.cloudflare.com/workers/get-started/quickstarts/).
```json
{"@context":"https://schema.org","@type":"BreadcrumbList","itemListElement":[{"@type":"ListItem","position":1,"item":{"@id":"/directory/","name":"Directory"}},{"@type":"ListItem","position":2,"item":{"@id":"/pages/","name":"Pages"}},{"@type":"ListItem","position":3,"item":{"@id":"/pages/tutorials/","name":"Tutorials"}},{"@type":"ListItem","position":4,"item":{"@id":"/pages/tutorials/localize-a-website/","name":"Localize a website with HTMLRewriter"}}]}
```